Submission Impossible - Part 1 - Apple
Today I’d like to tell you a little bit about the technical side of submission and release management and share with you some of my problems and the solutions I found when dealing with Apple’s iTunes Connect, Xcode and Testflight.
This blog post is probably not answering all your questions but I hope it helps to avoid as much trouble as possible. Of course I am happy to answer any follow up question you might have.

Step 1. Before submitting!
The very first thing you have to know when submitting your app to Apple’s App Store is that you need a MAC system and Apple´s tool Xcode.
There are however companies who offer cloud solutions. For example: https://www.macincloud.com/
You have the option developing your app by for example using the tool Xamarian
within Visual Studio but you still need the MAC for submission.
Make sure that you have all your Apple certificates installed on your MAC including the provisioning profiles. You can either check this by opening Xcode and go to the tab “Accounts” and “Details” or you open Keychain Access and check under “My Certificates”.
Of course you have to be registered at the Apple Developer Program. Register here for the Apple Developer Program.
If a certificate or provisioning profile is missing, expired or shows unwanted “Entitlement Features” (Game Center, iCloud etc.), you can either use Xcode to revoke and create new certificates (Make sure automatic code signing is enabled) or manage all of this by logging into the Developer Portal.
At the WWDC17 (In May 2017) Apple announced that they are going to add a function to Xcode allowing you to simply switch certificates and profiles when signing your app.
If you need help dealing with the certificates on the developer portal, I can recommend these (very helpful) tutorials:
2) Create Provisioning Profiles
Please keep in mind that you need to have iOS certificates for production and provisioning profiles for distribution.
Signing your app with a development certificate and uploading it to Apple won’t work - even for Testflight you need your app signed with a production certificate.
The next question is wheter you are submitting your build directly through Apples Xcode or are you submitting by using Application Loader?
Both systems work and you get the same result - they upload your build to iTunes Connect. However, Application Loader “only” takes (.ipa, .pkg and .zip files.)
Application Loader is part of the developer tools within Xcode.
If you want to learn more about Application Loader and also the command-line tool “altool” please check here.
Step 2. Upload started!
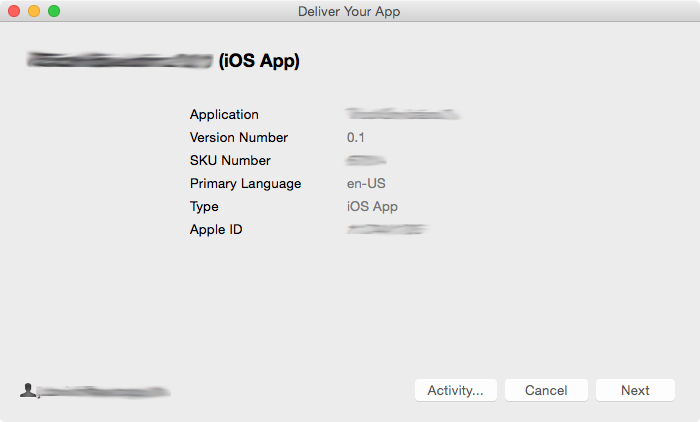
Once you selected the file you plan to upload using Application Loader you get a first overview about your application details, including name, version number, SKU number, primary language, copyright type and Apple ID. Now, choose “Next” and the upload is on its way.

During the uploading process you receive several information, like remaining time, verification messages or information about the creation of an API analysis.
This pre-check now goes through your binary file and checks if the app is properly signed or if anything about the bundle is invalid.
This includes incompatible values used in the info.plist or expired certificates.
If there are any error messages, the app will not be uploaded to iTunes Connect and therefore not be available for Testflight - you have to fix the issues first!
Please keep in mind: Even though you only have minor issues to fix, you are forced to increase the value of the key “Bundle Version” with every new build uploaded.
Uploading the same version will give you another error message saying there already is a build with this bundle version.
Note:
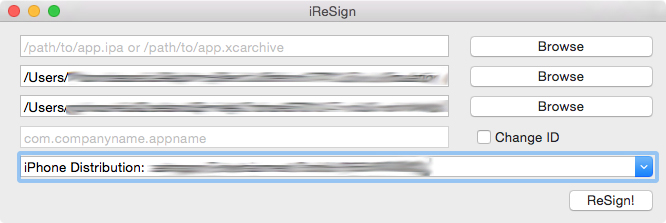
If you only have access to the ipa file and for instance need to update the bundle version number, I can recommend using the free tool called iResign – it allows you to quickly resign the app. It saved me a lot of time and trouble.

If the upload is successful, you can expect to see your build become available in iTunes Connect within a couple of hours.
Step 3. Build arrived at iTunes Connect - Testing
Once the build is available at iTunes Connect you should be able to select and manage it in Testflight and add it to your App Store page for submission.
If you already set up your Testflight and added a team of internal testers, they should be able to test the build right away - with the latest improvements to Testflight you can now test several versions at the same time, test builds that are already released and also create external testing groups more easily.
External Testflight builds need to be approved by Apple – this usually takes about a day. If you upload a build with the same version number (Not Bundle Version) this approval process is only necessary once.
However one platform is still not able to profit from Testflight, namely MAC applications. You need to test them manually on your MAC system. So before uploading to iTunes Connect run the build on the test systems.
The Apple Guide can help you here.
I highly recommend adding the apple receipt validation to your MAC game which helps to prevent unauthorized copies of your game to start.
Step 4. Submission Countdown
Before submitting the app to Apple for approval, you should make sure that you have all assets in place, activated and added the Apple features (Game Center, InApp packages etc.) to the store page.
Uploading them to iTunes Connect is not enough, they have to be added to the store page and of course be part of the Bundle Id.
InApps, for instance, need to be ready for testing and if your InApp uses the content hosting with Apple you need to submit the actual content for approval.
Now you can choose a build for submission, check the build’s store page information and make sure it for instance has all the language listed – if your app supports multiple languages, make sure they are all here.
Do you plan to do an automated release as soon as Apple approves your app? In this case, make sure you reset achievement and leaderboard data before going live.
Step 5. Submitting to Apple!
Once you are all set, you can push the button “Submit for Review” and follow the Apple questions about Export Compliance, Content Rights and Advertising Identifier (IDFA).
More information at Apple’s Developer Guide:
Usually, Apple takes between one or two days to review your iOS submission and one day for a MAC submission. Expect more days when there is holidays coming up.
The following is a very helpful page to see how busy Apple is Average App Store Review Times:
Note:
Store page assets can be changed after you hit “Submit for Review”. However, this is only possible as long as the status is on “Waiting for review”.
Once it changes to “In Review” assets such as “keywords, screenshots, videos, name and app icon” can no longer be changed unless you cancel the submission. Store text, promotional text, copyright but also privacy police, support and marketing URL can no longer be changed after the approval. Apple / iTunes Connect changed this in late 2017.
Some possible issues and also solutions:
- If you have a time sensitive submission DO NOT update your Xcode right before you plan to upload the build. Always plan ahead and look on Apple’s update agenda.
- Make sure to delete expired certificates within your keychain - accidentally signing your app or pkg with an expired key can cost valuable time.
- The MAC app icon is taken from the pkg file you uploaded. Don’t be confused that you cannot add it seperately to iTunes Connect.
- If you have more than one person or team working within your Apple account, make sure they are all using the same signing certificate. Worst thing that can happen is that someone in your team revokes a certificate right before you can sign the app.
- You have an urgent update and it has to go live today? You should consider asking for an “Expedited app review”.
- You plan not to support certain Apple devices like iPod Touch? There is no official way to exclude iPod Touch devices from being available in the store. But you can try a different approach and ask for specific device capabilities which iPod Touch can not fulfil – the key “magnetometer” for instance. You can easily add it to the info.plist. Remember: If you set a capability you don’t use to “required”, you can have your app rejected by Apple.
- It might happen that you have to reject your app submission and receive the following message from Apple about your IAP:
“We have returned your IAP product/s to you, since you’ve rejected the associated binary from the review process. When you are ready to re-submit the binary, please resubmit the IAPs with the binary.”
In this case you will want to try resubmitting your new build, but Apple might still not let you and instead ask you to “modify or delete” problems within your IAP
Eventhough this sounds strange, all you have to is to make trivial changes to the text of your IAP products allowing you to save it. The IAP status is now changed to “Waiting for review” and you can submit the app including the IAP content.
Feel free to leave your comments, suggestions and questions.
Good luck with your submission. I have my fingers crossed for a smooth and successful release of your next app.
Yours
Julian